The Practical and Stylish Guide to Accent Tile Behind Stove
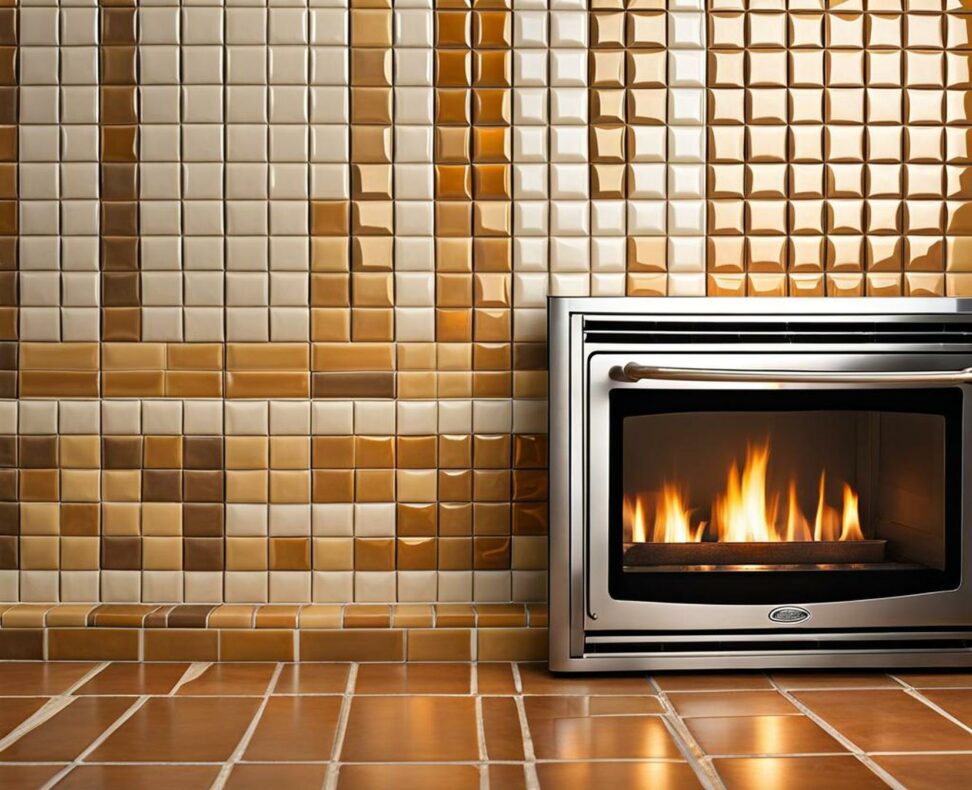
The area behind the stove is one of the most functional spaces in any kitchen. As the cooking command center, it not only sees a lot of action but also takes a bit of a beating from splatters, spills, heat, and steam. Instead of leaving the wall unadorned, many homeowners are opting to protect and beautify this high-traffic area with accent tile.
Tile behind the stove adds visual interest to the cooking zone while also guarding the walls from grease, moisture, and stains. With so many colors, textures, shapes, and materials to choose from, accent tile offers almost limitless options to complement your existing kitchen design or make a bold statement.
This comprehensive guide covers everything you need to know about successfully incorporating accent tile behind your stove. We'll discuss how to select the perfect tile for your kitchen, get inspired with gorgeous design ideas, properly install it, and keep it looking like new. Let's get started transforming that blank wall into a functional and stylish focal point!
Choosing Accent Tile for Behind the Stove
The first step in creating your culinary backsplash is picking out the ideal tile. Keep the following considerations in mind when making your selection:
Consider the Kitchen's Overall Style
Will the accent tile blend seamlessly into your existing kitchen style, or will it make a bold decorative statement? For a more coordinated look, choose a tile that fits with the current design scheme. For example, in a minimalist or modern kitchen, sleek and simple tile in a solid color may look best. In a traditional vintage-inspired kitchen, go for something more ornate like decorativerelief tiles or mosaics. If you want the tile to stand out, select something with contrasting colors, textures, or designs.
Match the Color Scheme
Select a tile hue that either pulls from the current color scheme or plays against it. To tie the whole kitchen together, go for a shade already present in the backsplash, cabinets, or countertops. Or make the stove area pop with an unexpected bright or dark color. Tiles are available in every color of the rainbow, so you can easily match or mix-and-match.
| Option | Benefits |
|---|---|
| Match existing colors | Creates a cohesive, flowing look |
| Contrasting color | Adds excitement and becomes a focal point |
Size and Shape
Tile comes in a vast array of sizes and shapes these days. Typically, thinner 1x1 inch and 2x2 inch tiles have a more subtle effect, while larger rectangular, square, or hexagonal tiles make more of an impact. Larger tiles can also help open up smaller kitchen spaces visually. The shape you choose may depend on the existing style - for example, subway tiles for a vintage kitchen or octagons for a mid-century modern look.
Material and Texture
Natural stone, ceramic, porcelain, and glass are all popular choices. Focus on durability and ease of cleaning when selecting a material. Porcelain and glass tiles resist staining and hold up well to heat, grease, and moisture. Natural stone like marble will require more sealing and maintenance to prevent etching. Beyond material, also consider the texture and finish. Matte tiles conceal kitchen messes and reflect less light, while glossy versions have a sleek, polished look. Textured tiles add visual interest, but can be harder to keep clean.
Design Inspiration and Ideas
Now comes the fun part - deciding on the design for your stove tile! From vibrant colors to ornate patterns, the options are virtually endless. Here are some eye-catching ways to use accent tile behind the range:
Matching Backsplash Tile
One idea is to continue the backsplash tile across the stove wall for a cohesive look. This helps connect the backsplash and stove area visually. Alternately, use a contrasting or complementary tile to distinguish the cooking zone from the backsplash.
| Design Option | Benefits |
|---|---|
| Continuation of backsplash tile | Creates a unified visual flow |
| Contrasting tile | Clearly separates cooking area from backsplash |
Mosaics and Patterns
Make a statement by using tile that incorporates ornate mosaics, geometric patterns, decorative insets, or hand-painted designs. For example, Moroccan-style tiles, mission-inspired motifs, or an artsy reinterpretation of classic subway tiles. Patterned or mosaic tile packs visual interest into a relatively small area.
Mixing Tiles
You're not limited to just one tile - get creative by combining colors, sizes, textures, and materials. Using different tiles side-by-side provides contrast and visual appeal. Or frame specialty accent tiles with more classic coordinating tiles. Mixing it up makes for an eclectic, one-of-a-kind stove backsplash.
Shelving and Niches
Beyond just flat tile, some designers incorporate shelving or niches into the stove backsplash area. This adds function along with the form. Floating shelves flanking the stove provide a spot for cookbooks, spices, oils, or decorative items. Small niches act like display boxes to highlight vases, candles, or other special treasures. Built-in shelving works especially well if you have a wider area to tile.
Installation Tips and Considerations
While the design is key, proper installation is also crucial for a long-lasting accent tile backsplash. Here are some best practices to follow:
Hiring a Professional
Successfully tiling behind a stove requires some specialized skills. The preparatory work, precise tile-cutting, and grouting techniques differ from regular backsplash installation. Hiring a professional tile setter with experience tiling stove backsplashes can help ensure quality results. Be sure to check their previous stove tile work.
Prep the Area
Proper prep is the foundation of a durable installation. Remove any existing wall coverings down to the bare surface. Inspect for any needed repairs to the wall itself. Thoroughly clean and dry the entire area before applying any adhesive. Any grease or dirt will impede adhesion.
Use Proper Materials
Cement board or another heat-resistant backer board rated for high temperatures provides a stable base. Choose a thinset mortar adhesive specifically formulated for wall tile rather than one for floors. Use a polymer-modified thinset for extra strength. For grout, use an epoxy-based product designed for areas exposed to high heat and moisture.
Sealing and Grouting
Sealing the tiles and grout lines properly is key in the cooking zone. Apply a grout sealer to tiles prior to grouting for an impervious surface. Always carefully clean any grout haze immediately after application. Letting it set will make removal far more difficult.
Heat and Moisture Concerns
Take extra care given the high heat and humidity. Allow thinset mortar to fully cure for the recommended time before exposing it to stove heat so it doesn't dry prematurely. Only use materials designed for high-heat areas with proper thermal expansion properties. Consider gaps at edges or mismatched grout lines over time if using certain materials.
Caring for and Maintaining Stove Tile
Putting in the effort to properly care for your stove tile will keep it looking fresh. Follow these maintenance tips:
Regular Cleaning
Frequently wipe down the entire tiled stove backsplash using a gentle, non-abrasive tile cleaner. Avoid harsh chemicals or scrubbing pads. For a safe, eco-friendly option, mix baking soda and water into a paste. Thorough cleaning prevents grease buildup.
Sealing
Reapply grout sealer regularly as needed, especially for natural stone tile. Sealing minimizes staining from cooking residue and moisture penetration. It also increases the tile's longevity.
Damage Inspection
Over time, inspect for any cracked, broken, or missing tiles. Check for damage or wear to grout lines as well. Repair any issues immediately to prevent exacerbating existing problems. Catching them early makes repairs far easier.
Installing accent tile behind your stove completely transforms the space from boring to beautiful. With so many options, you can easily match your kitchen's existing style or make a bold statement. Choose tile shapes, colors, and designs that complement your cabinets, counters, and backsplashes. Proper installation and maintenance will keep your stove tile looking like new for years. Get ready to enjoy a stylish, yet practical focal point while you cook!