Make a Splash With Creative Epoxy Bathroom Floor Ideas
Upgrading your bathroom floors can completely transform the look and feel of your space. If you're looking for a flooring option that is durable, waterproof, and incredibly customizable, epoxy may be the perfect choice. Keep reading to explore some creative epoxy bathroom floor ideas that will make a stylish splash in your home.
Epoxy flooring has many benefits that make it ideal for bathrooms. It is resistant to water, stains, and scratches, so it can stand up to the high-moisture environment. The seamless finish ensures nowhere for mold or mildew to grow. You can choose from countless colors and finishes to match your design aesthetic. And the durability provides a practical, long-lasting flooring solution built to last decades.
Benefits of Epoxy Bathroom Floors
Extreme Durability
One of the biggest advantages of epoxy flooring is its incredible durability. Properly installed, it can withstand decades of heavy foot traffic without signs of wear and tear. This makes it a practical choice for busy family bathrooms.
Epoxy is also highly moisture resistant, making it perfect for damp bathroom environments. Water splashes and drips bead up on the surface rather than soaking in like carpet or grout. You won't have to worry about continuous water exposure damaging or warping an epoxy floor over time.
Customizable Styles
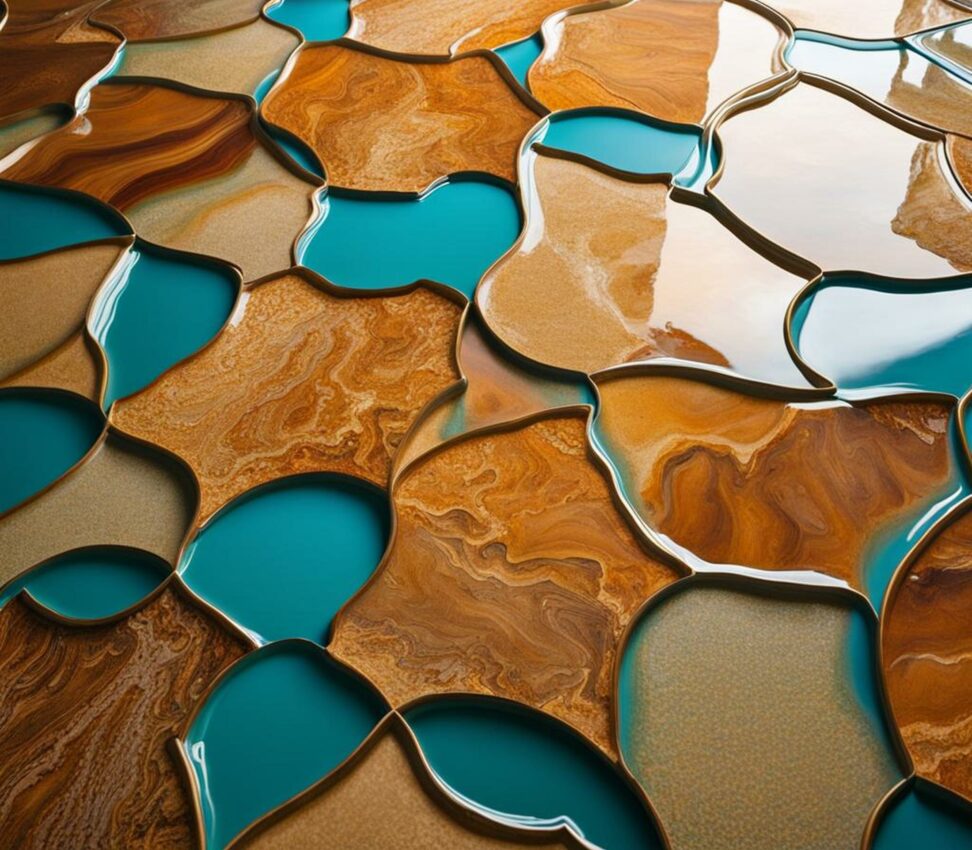
With epoxy flooring, the design options are virtually endless. You can choose from a huge array of color combinations, patterns, and finishes to complement your bathroom's decor. Adding colored flakes or metallic powders into the epoxy blend allows you to create custom swirled designs. For a more hands-on approach, you can press textures or 3D objects like shells into the coating before it dries.
Whether your style is modern, beachy, traditional, or something in between, there is an epoxy look that will match. It's a great way to add a pop of personality and visual interest underfoot. Coordinating your vanity, fixtures, and accessories will tie the whole room together.
Low Maintenance
One of the hassles of traditional bathroom flooring options like grouted tile or natural stone is keeping the grout lines clean. Grime and mildew can stain the grout, requiring periodic heavy-duty cleaning. With seamless epoxy floors, you don't have to worry about dirty grout lines. The non-porous surface wipes clean with little effort.
Epoxy's durable finish also resists scratches, scuffs, and stains, so it retains its like-new sheen for years. Just an occasional sweep and damp mop is all that's needed for everyday maintenance. The reduced time spent on floor cleaning and repairs makes epoxy a practical choice.
DIY Friendly Installation
Installing epoxy flooring yourself is a very doable DIY project for many homeowners, which can translate to big savings on labor costs. With proper preparation of the subfloor and some basic tools, you can create a customized epoxy floor. There are also many user-friendly epoxy floor kits available that provide all the materials and instructions you need.
The most important steps when working with epoxy are precise measurement and mixture of the resin components, as well as following the layering directions. Patience and attention to detail will help ensure proper application and cure time for each coat. Although DIY-friendly, larger installations or complicated layouts may benefit from a professional installer.
Popular Epoxy Bathroom Floor Ideas
"Ocean Floor" Theme
For beach house flair, an ocean floor design is a creative way to bring the spirit of the sea right into your bathroom. Start by printing out a large picture of an underwater scene, like coral reefs, sea creatures, or rippling waves. Apply a clear layer of epoxy resin over the image to seal it in place. The result: a floor that looks like a porthole peeking into the ocean depths!
Experiment with different ocean colors in the epoxy layers, like deep blues and greens. Add accents like shells or glass beads so it's sparkling from every angle. An ocean floor is sure to delight and relax anyone who steps inside.
Swirling Metallic Colors
For a modern, abstract look, metallic epoxy floors are a striking choice. Start with a neutral base color like white, gray, or black. As you mix the epoxy resin, blend in colored metallic powders like copper, silver, or gold. The powders will create a shimmering, marbled effect.
Using a wave motion when applying the epoxy will encourage the metallic colors to swirl. For added depth, use several coats in complementary colors, allowing each to fully dry before the next application. The finished product will resemble bold modern art underfoot!
Faux Tile or Stone
Epoxy coatings can be used to create a faux tile or natural stone look that is completely seamless. Use stencils to mark grout lines and textures in the coating before it cures. When complete, you'll have the visual appeal of tile or marble without the maintenance hassles of real grout.
With epoxy "tile", you won't have to worry about dirty grout, missing tiles, or cracked and uneven surfaces. The epoxy coating is contiguous and bonded solidly to the floor below. Choose from traditional patterns like subway tile or get creative with shape and color combinations. For natural stone effects, use tan, gray, or black bases with hobby store rock molds.
Beach Theme
You can bring a breezy, beach vibe to your bathroom with the look of sand underfoot. Start with an epoxy base color like beige, tan, or light brown. Before the layer dries, press in sand or natural shells to create texture. Top it off with a clear coat high-gloss finish.
For a cohesive look, stick with coastal blue, seafoam green, and sand-inspired colors in your epoxy layers. Add wave or water ripple imprints for visual interest. Driftwood-look vanities and rattan baskets continue the laid-back style. An epoxy beach floor sets a relaxing tone when you need an escape from the daily grind.
Step-by-Step Installation Guide
Transforming your bathroom with a shiny new epoxy floor is easier than you might think.
As with any flooring project, proper prep of the surface is crucial. Remove any old flooring or coatings so the epoxy can adhere directly to the bare substrate. Use a diamond grinder to scarify concrete surfaces. Sweep and mop until the floor is completely clean and dust-free.
Check for any cracks or imperfections that should be patched and leveled. Etching the surface will help the epoxy bond tightly. Wipe with acetone before application to remove any remaining residue. Careful prep gives the epoxy the best foundation.
Mix and Pour Epoxy
Once prepped, it's time to mix and apply the epoxy. Carefully measure out each resin component according to the manufacturer's ratios. Thoroughly mix the two parts together using a paddle drill bit. Work in small batches so you have adequate working time before the epoxy begins to cure.
Pour the epoxy slowly and spread into a thin, even layer using a notched squeegee. Allow the coat to fully cure for a day or more before adding artistic effects or subsequent layers. Metallic powders and texture materials can be pressed into the coating during this work time.
Add Top Coat(s)
After your design is complete, apply one or more clear top coats to seal and protect the finished floor. These clear layers help prevent scratches and chemical damage over time. Reapply top coats periodically as needed, or every 2-5 years for optimal shine and durability.
Pros Who Can Help With Installation
While a DIY epoxy floor is certainly feasible, some circumstances call for letting the pros handle it. Here are some situations where you may want to hire an experienced epoxy flooring contractor:
- Large surface area - Epoxy dries quickly, so larger floors are challenging for DIYers to finish in time.
- Complex layouts - Professional installers have the tools and expertise to coat intricate shapes and tight spaces.
- New construction - Application during building lets floors cure before finishings are installed.
- Heavy-duty use - Commercial and industrial sites need professional-grade epoxy formulated for high traffic.
- Limited time - Professionals will complete the project much faster than a DIY pace.
When searching for a qualified epoxy flooring contractor, look for an experienced team with positive reviews. Be sure to get an itemized estimate for the costs involved. Expect to pay anywhere from $3 to $9 per square foot for materials and professional installation.
Maintaining Your Epoxy Floors
Caring for your new epoxy bathroom flooring is simple. Here are some tips to help it maintain its flawless shine:
- Sweep frequently to prevent dirt buildup that can scratch the surface.
- Damp mop with mild cleaner to remove grime; avoid harsh chemicals.
- Immediately wipe up spills to prevent stains from setting.
- Reapply protective topcoat every 2-5 years as gloss starts to fade.
- Use furniture pads and rug backings to prevent scratching.
- Avoid rubber mats that may discolor the epoxy over time.
Renewing the clear topcoat periodically will keep your floors looking like new. Avoid abrasive scrubbing that could damage the finish. With proper care, your epoxy bathroom floors will maintain their brilliant luster for decades.
When it's time to replace your outdated or damaged bathroom floors, epoxy coatings offer durability, customization, and easy maintenance all in one. With endless options for colors, textures, and designs, you can give your bathroom a completely unique look. The waterproof, seamless finish stands up to heavy use without developing cracks and stains over time.
Whether you want to install chic faux stone, lively swirling metallics, or the beauty of an ocean floor, epoxy bathroom floors let you get as creative as you desire. By combining functionality and aesthetics, epoxy flooring gives your space a stylish, polished look built to last for years of enjoyment.