Build Your Dream Backyard Pavilion With This Easy DIY Guide
A backyard pavilion can transform your outdoor space into a relaxing oasis for entertainment, dining, and recreation. With some planning, basic tools, and DIY know-how, you can build your own custom pavilion and save thousands compared to hiring a contractor. This easy, step-by-step guide will walk you through the entire pavilion building process so you can create your dream backyard retreat.
Constructing a DIY backyard pavilion allows you to customize the size, layout, and features based on your needs. Whether you need extra seating for backyard barbeques, a shaded spot for the kids to play, or an open-air extension for al fresco dining, a pavilion adds function and beauty to any landscape. Building it yourself means you can incorporate repurposed materials, eco-friendly building supplies, and personal touches to make your pavilion uniquely yours.
Planning Your Backyard Pavilion
Determine Your Needs
When deciding to construct a DIY backyard pavilion, first think about how you want to use the space. Consider your needs for seating, dining, grilling, storage, shelter from weather, and more. Factor in your climate, yard size, and how the pavilion will integrate with existing landscaping.
Determine the optimal dimensions based on the pavilion's purpose and your available yard area. A 16x20 ft pavilion allows ample room for seating and dining furnishings. For a more intimate feel, a 12x14 ft design works well. Make sure to leave enough clearance from fences, trees, and other structures.
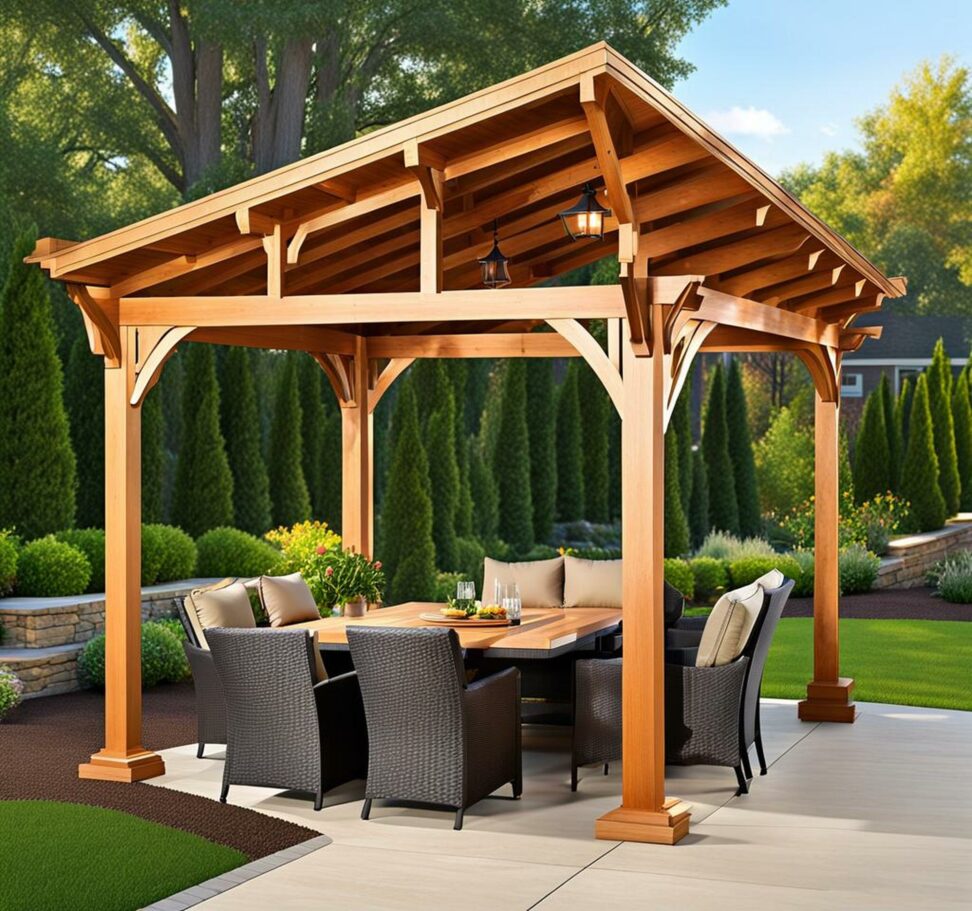
Choose a Design
Consider the pavilion's roof style, which affects both aesthetics and function. Gable and hip roofs shed precipitation and let in light, while lean-to designs provide excellent coverage for one open side. The pitch, roofing material, and inclusion of overhangs or skylights also impact lighting, ventilation, and weather protection.
Decide whether you want an enclosed pavilion or completely open-air. Partial walls offer screening while still allowing breezes. Open designs maximize views and flexible use of space. Customize with ceiling fans, lighting, electrical outlets, and other features to enhance comfort and ambiance.
Obtain Permits
Research your local county or city regulations to determine if you need a building permit for the pavilion size you have planned. Obtaining the proper permits ensures your project meets codes for safety and structural integrity. The application process may require submitting pavilion drawings, materials lists, and fees.
Pick Materials
Choose suitable lumber for the structural framework, such as pressure-treated pine, cedar, or redwood which resist weathering and insects. Pecan, oak, and other durable hardwoods also work well. For a low maintenance option, use vinyl or composite materials.
Select appropriate roofing like architectural asphalt shingles, standing seam metal, or corrugated panels. Additional options for siding, decking, railings, and other finishes let you customize the look you want.
Prepare the Site
Start by using stakes and string to mark off the pavilion's perimeter based on your chosen dimensions. This visual outline helps guide the rest of the building process. Remove any grass or plants inside the marked area.
Level the ground, fill any dips, and compact the soil to create a flat surface. Add a 4-6 inch gravel base, tamping it down. This provides proper drainage and prevents sinking or shifting of the foundation over time.
Build the Foundation
There are two main foundation options for pavilions: Concrete slab - Forms a single, solid pad for the floor. Pouring a slab involves building a perimeter form, installing rebar grids for reinforcement, leveling the wet concrete, then finishing the surface. Pier and beam - Uses individual concrete footings and piers to support vertical posts. Less site preparation is needed but leveling all piers is critical.
For either style foundation, dig holes or trenches as needed for the formwork. Secure corner posts with metal anchors once the concrete cures, which takes 1-2 weeks. This permanently attaches the pavilion structure.
Erect the Framing
The framing provides the pavilion's structural bones and must be properly measured, cut, and assembled. Start by installing the support beams on top of the foundation. Check them for level and secure with concrete anchors.
Cut posts, joists, and rafters to the required lengths and angles. Follow a framing plan to determine sizes and spacing based on local building codes. Use galvanized joist hangers, hurricane ties, and lag screws for strong connections.
Assemble the roof trusses on the ground, then lift and attach them to the posts and beams. For pavilions with a simple gable roof, stick framing the rafters individually is often easier. Add bracing and blocking to reinforce the entire frame against lateral forces like wind.
Add the Roof
Install a waterproof membrane or felt paper over the roof decking to protect from moisture penetration. Cover this underlayment with your choice of roofing material, such as asphalt shingles, standing seam metal panels, or corrugated plastic or fiberglass sheets.
Cut panels to size and overlap properly with the correct fastener type. Include wide overhangs or eaves for increased weather protection and style. Flash and seal around any roof openings or protrusions like vents, lights, and chimneys.
Roofing Material Options
- Asphalt or composite shingles - affordable and easy to install
- Metal panels - long lasting but higher upfront cost
- Plastic or fiberglass corrugated sheets - lightweight and inexpensive
- Slate or clay tile - beautiful but heavy and fragile
- Thatched roofing - natural appeal but high maintenance
Install Siding and Trim
Apply siding and trim to protect the framing from weather and improve aesthetics. Options like board and batten, vertical tongue and groove, or horizontal lap siding in wood, vinyl, and fiber cement are low maintenance and match many home styles.
Wrap fascia boards around roof edges and rafter tails. Install soffit panels to enclose roof overhangs. Use trim around doors, windows, corners, and openings. Caulk gaps then prime and paint or stain all siding and trim boards.
Siding Tips
- Use thicker boards on the bottom for increased durability.
- Allow 1/8" gaps between siding for expansion and contraction.
- Overlap joints away from prevailing wind direction.
- Include proper flashings around penetrations.
Include Extras
The right accessories take your pavilion from basic to spectacular. String lights or lanterns hanging from rafters set a warm, welcoming glow for evening enjoyment. Ceiling fans circulate air and keep the space comfortable in warm weather.
For entertaining, include seating areas, dining sets, grills, and prep stations arranged conveniently around the perimeter. Built-in benches with hidden storage compartments keep frequently used items organized yet easily accessible.
Plant trees, shrubs, and vines around the pavilion to provide cooling shade or colorful flowers. Incorporate repurposed items like vintage doors or salvaged barn wood to add character. The options for customizing your backyard pavilion are limited only by your imagination.
Creating your own DIY backyard pavilion allows you to increase your usable outdoor living space at a fraction of the cost of hiring a contractor. With proper planning and construction, you can build a pavilion tailored exactly to your needs and style.
This guide covered key steps like determining your design, obtaining permits, preparing the site, building the foundation, framing the structure, roofing, installing siding, and adding unique finishing touches. Follow the techniques described above and soon you'll be hosting summer barbeques, reading in the shade, or simply relaxing in your dream backyard pavilion escape.
For further inspiration, check out online resources with pavilion plans, cost calculators, and photo galleries. We'd also love to see photos of your completed DIY pavilion project!